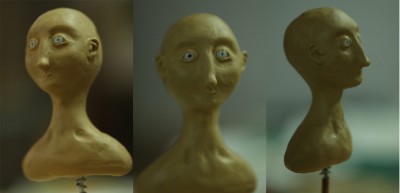
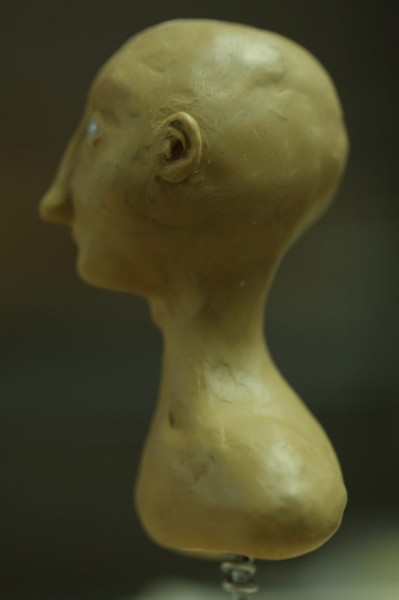
I’ve sculpted Puppet #2. Don’t have a name for him yet. (Click to enlargeth.)
I’m really fond of that ear. The other one isn’t as good. They’re hard to duplicate exactly, and I did this one first.
I used Medium-density plastecine, simply because when I first started doing these puppet sculpts, I didn’t know the advantages of working with hard clay, and just figured I’d make things easier on myself by not having to knead rock-hard clay for 4 hours before being able to sculpt it. I’m new to the moldmaking process, so I’ve since heard the theory (from Ron Cole in his excellent mold-making tutorial) that the rock hard stuff is the way to go. So when I run out of this stuff, I’ll try his advice. But for now I really like the looseness and ease of modelling with the Medium.
Anyhoo… I thought I’d mention my thought process behind creating these characters. I don’t sketch my characters before sculpting them, which may be a mistake, but I just find I think better in 3 dimensions. I start out with an idea for the character, i.e. all my characters will have these tiny pouty lips and some kind of exaggerated aspect to their features. For this guy, it’s his nose. I like the elongation and the knobbiness of it. I wanted him to look friendly, so angled his eyes down a bit at their outer corners. I wanted him to look a little awkward, so stuck his ears out a little. Basically I work away at the shapes until they just feel right.
I’m not too influenced (consciously anyway) by stop motion characters that already exist. For the characters I’ve sculpted so far, Sabela and #2, I’ve looked to illustration and sculpture. Specifically, I like the illustrations of James Jean, Jonathan Viner, Sam Weber, and the sculptures of Scott Radke. I think you can see a little of Jonathan Viner’s male characters in #2 here. Perhaps.
Next, I need to make his plaster mold. I’m juggling 5 different things at the moment. One of which is letting the latex skin dry on a backup Sabela head — I should be posting the next stage of that casting, the urethane foam stage, in the next couple of days. Then the legs, hands, and hair.
Whew!


I love reading about your process! This character indeed does look friendly and slightly awkward as you intended. And I love that you make your characters in clay first rather than sketching. I sculpt first too and then create the sketch after the fact with photos and painterly effects in Photoshop. It worked for me but now I don’t feel guilty for it. Thank you.
Cool to read your process!
and thanks for shareing your art with us.
jriggity
Thanks for reading, guys!
Shelley, I have some sort of mental block when it comes to drawing from imagination. I feel a bit guilty about it too. But I guess if it works to “sketch” in clay then why not! I do the same thing in clay as when I draw from life — start out with the rough shapes and then gradually refine them.
The down side to not learning how to sketch your ideas is that it only works if you’re doing everything yourself. I guess a director could do the initial character designs in clay, which would be very unusual from what I’ve seen. (In the CG world.)
Completely right. In our cases we don’t need to communicate the concepts to anyone else. The ability to draw is a magical mystery to me and I’m fine leaving it that way. I don’t want to spend the years it would take learning the magic when I can get right to the goodies of creating what I like now. I can’t draw but there’s Photoshop and that’s fine for me.
Tip of the day: The trick to working with hard oil clays is to build a “clay cave.” This is just a cone of tin foil with a light bulb at one end. Like an “easy bake oven,” the clay goes in and the light warms and softens it. Then, whenever you need another chunk of soft clay, you just pull a dab out of the cave.
A word of warning, though… Clay that’s too close to the bulb will liquify — which can be a nasty burn on the fingers!
Thanks Sven, I’ll definitely try the clay light cave idea when I get my next batch of clay — the Hard Chavant. I’m still curious to try it!