Full Circle

Well, I shot the LAST frame of the film today.  There is still more to shoot, but just elements — text, transitions, that sort of thing.  But the main stuff is DONE!  Or in the can, as they say.

I didn’t really realize it til I was actually shooting it, but the final scene ends right where the first scene that I shot began!  It’s like I knew what I was doing or something.  Haha.   Here’s to seamless transitions!

I’m VERY happy with everything, every scene that was shot.  I have so much more to do, and time is running out, but I will try to keep things updated a little better here throughout the post production process.  At least I’ll be at my computer all day, every day, again!  It’s been a while since I’ve done loads of straight “computer work.”  It’s a very familiar headspace for me though, so it should be one of those easy yet labour-intensive processes.  If that makes sense.  (Three minutes of film is a *lot* to finesse.)

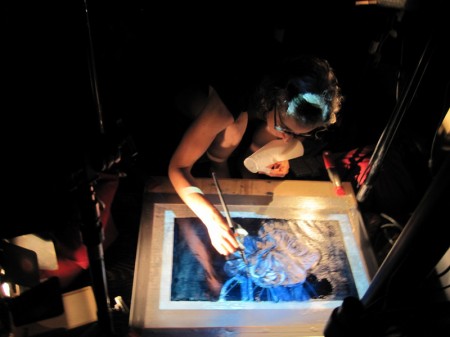
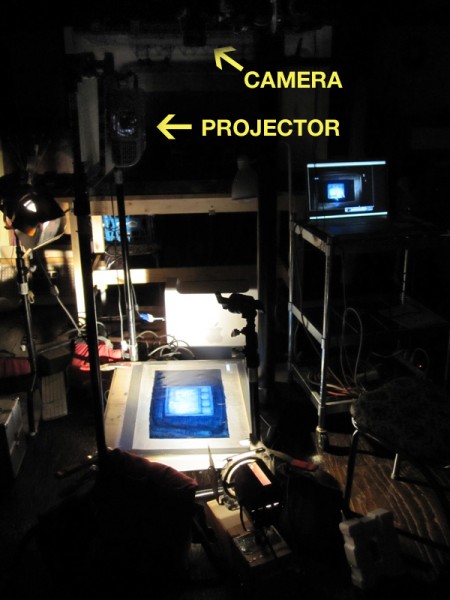
So, here’s the setup of the final scene, which was shot with oils on paper, with projected images.  It was sort of hard to document this setup, but the gist is that there’s a projector hooked up to a computer, and a camera hooked up to another computer — one computer projects the image, then I paint it, then I turn the projector off, then I take the photo.  It took about a month to shoot this section, which was just over 33 seconds long.  Whew!

There’s something being projected into my hair…

Minimal setup — just 2 lights…

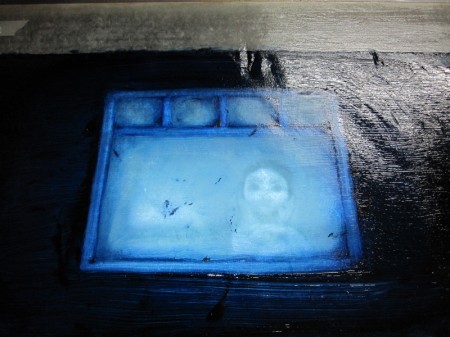
Oooh, spooky!  Here’s the final image projected on…

And here’s a snippet of the animation!  This is totally work in progress, pre colour-correction, etc.

Now, I head straight into post production!  OK with maybe a little celebrating in between.  🙂

Very Quick Update

Oh dear, I haven’t updated in a LONG time.  This summer is flying by.

I’m still working away on the film.  I’m currently 2/3 of the way through my 30-second 2D / 3D sequence.  The technique here is similar to the oil-on-glass technique of 2D animation, but I’m using something I did in 3DS Max as a reference, projecting it onto my “glass” (I’m using acrylic-coated paper) and rotoscoping.   An experiment for me, since I’ve never really done traditional 2D animation (thus the rotoscoping!) but it’s actually going pretty well.

I will post pictures of this setup soon…

There are only 2 more months left in my film schedule.  In this time, I have to finish shooting the oil paint elements, shoot some transitions and text elements (going to shoot these rather than After-Effects them — a recent decision, but I think it’ll look much better!)… compositing and rig removal (thankfully have some help with this though),  editing… title sequences… initial colour correction with Marcus and then hopefully with an in-suite colourist…  sound recording in Montreal (whee!), followed by sound design here in Toronto, and then… loads of finishing touches, I guess!

I will keep you posted more frequently as time permits!  :)  Due date to Bravo!:  October 1st…

Interview

Well, I guess it went OK — I am surely not cut out to be in front of the camera.

But I think of it this way — if I were living in a jungle somewhere, where there were tigers to run from, the fight or flight reaction in my central nervous system would be getting a regular workout, as it’s meant to.  But, living in the city, my fight or flight has chosen to respond to a) public speaking situations, b) being in front of a camera, and c) needles at the doctor’s office.  That’s it.  These three things turn me into a brainless mound of shaky jello.  I don’t avoid them, as I would a wild tiger, because I hope to one day get overcome this automatic reaction…  as non life-threatening as these situations are…

So I survived, and the interviewer and cameraperson from CTV were great — Angie and Steve.  They made the experience go as well as it possibly could, under the circumstances.  Angie was so sweet, and had done impressive amounts of research, and Steve got me to press the “capture” button and pretend to shoot frames of animation for their b-roll footage… as well as powdering my shiny nose.  Irene was there too, sitting behind the scenes, reminding me of some things to talk about.

I have a feeling I will owe big apologies to Erin one day if she sees this on air… I’m not entirely sure what I said, but I may have implied that she helped with the original proposal, when in fact she had merely offered a couple of suggestions.  She made it clear at the beginning that this film was my interpretation of her poem, and that she wanted to distance her involvement from it as much as possible, in terms of it being a narrated version of her poem… it’s really quite separate.  So hopefully I didn’t imply anything different… I have a feeling I may have used the word “collaborate” when talking about the proposal, but I’m not sure.  Anyway, this will be made 100% clear in the written credits of the film, and hopefully the folks at Bravo will leave that rambly part out…?

It’s probably not a big deal, and I may be worrying too much about it.  I don’t think I said anything wrong.  But I sure have a new respect for anyone who has to be interviewed on camera regularly.  It’s tough.

Um, anyway, thank you Angie and Steve; I hope you can find a coherent 2 minutes in there somewhere.

Forgot to Mention…

I forgot to mention some great news — I was awarded a FAP grant from the NFB…  an award for new filmmakers.  I am super thrilled to be working with the NFB, if only for now to have help with the costs of post production.  Perhaps one day I’ll be making a short film with them.  I already have ideas 😉

Annnnd I am going to be interviewed Monday by CTV, for their show Bravo!FACT Presents.  I am extremely camera shy, so I am trying very hard not to freak out about it.  I’m sure it’ll go well!  (…psyching myself up.)

Hard to Believe

It’s hard to believe,  but I am finished shooting the puppet / 3D set scenes.  Finished, after almost two years of working (on and off) on these scenes.  This is a big relief, as these shoots seemed like the hardest part of the filmmaking process, with all their unknowns… but of course I also feel a bit sad, as I do enjoy the process so much. Earlier this week I said goodbye to the puppets, and all my rented & borrowed equipment.

So since I last posted here, I have shot over a minute of cabbage shots, as well as the final three scenes, which involve the family of puppets sitting at a dining room table.  For the final scene, I rented a 3 foot linear bed from Whites, which allowed for a zoom out.  Let me tell you, these things are *amazing…*  There are so many possibilities to introduce smooth, easy camera moves with these things.  So easy to use — this one was perfectly smooth-sliding yet immovable once fixed — and easy to animate, as there’s a handy aluminum strip that my ruler measurements fit perfectly onto, and the little rubber stopper bit provided just the right vertical marker.  Marcus suggested a few other possibilities for this contraption, like of course dollying through a shot sideways, either hanging the bed and camera from the ceiling and flying through, or… or… well the possibilities are endless.  Camera moves are exciting!

Here’s a little video of me playing around with it…

Here is what went on behind the scenes.  I’ll do up a little post on the lighting setup when I get the chance.

This is the way I animated the camera — made a ruler in photoshop, complete with eases in and out…

Also had to animate most of the practical lights, dimming out at the end.  So their dimmers had circular rulers as well.  The notebook was to keep track of what I needed to animate — it was easy to get confused!

And finally, here is the precious, dear equipment that I had to return…  I’ll miss you, dedo kit with projection lens, and you too, my newfound friend, the 3 foot linear bed… sniff, sniff.  Maybe one day we’ll meet again…

The final scene —

So in terms of my progress:  all 3D stop motion scenes, including cabbage scenes, are done.  Next up:  opening titles, which will also be shot stop mo, and then I’m onto my 2D / 3D ink painting effects…  This week I build yet another miniature set for the opening titles.  Hopefully it’ll turn out the way I’m picturing it; I’ve had a couple false starts so far, but I think my current idea will work.

Final Scenes!

I have so much to write / post about here… but I am a very bad blogger.  Hopefully once things settle down I can post up some of the things I’ve been working on.

In the meantime, here’s a quickie… this scene feels like a culmination of a lot of people’s hard work… and I’m very excited that it’s going so smoothly so far!  I have two weeks left to finish up these final 3 scenes.  And let me tell you, I am SO thrilled about how they’re going so far.  Thanks to everyone who’s helped out — Marcus, Alli, Brian, Irene!!!  You guys are the best, and I simply cannot thank you enough!  I’m so, sooooo happy. Oh and those are Miriam’s little white chairs!  Thanks for those, too!!

This is just the WIP lighting setup — still a few things to tweak, and a few camera angles to figure out.  But I’m showing it here anyway because I’m just too excited about how it’s coming together…

In a short 2.5 weeks or so, ALL of the puppet / 3D set filming will be COMPLETE!!!!  Hurray!

Click to see the full picture…  Oops, there is fun-tak on the floor… Ah well it is just a work in progress…

Scaling Up

So, the past couple weeks has seen a return to set building, once again.  It’s been a while.

I had to build a scaled-up version of the copper pot, so that I could animate what’s inside of it in an overhead closeup.  I found a white plastic container at a local favourite junk store — Active Surplus — and modified it by lopping off the bottom (to make it the right proportion to the original pot), attaching a new, clear, plexy bottom (so that I can underlight it), sanding off a decal on the top, adding handles, etc.   (Thanks to Phil and Alli for their help with the copper paint and the vegetable modeling…)  The “3.2” written in the above pic was my formula for scaling the elements — I measured all the dimensions of the miniatures and multiplied by this magic number.

I think it turned out to be a relatively convincing version of the smaller stovetop and pot.  I added a few embellishments, just because it looked sorta plain without them:  black handles, and a more detailed, 70s-ish pot lid, also with a black handle.  (The plastic pail happened to come with this very lid — isn’t it a perfect pot lid??)

I wish I had taken “before” pictures, but I’m very happy with the transformation.

The miniature stove on the left; the larger scale one on the right.

Testing out the size of the font — will this cabbage leaf be legible?  🙂

Funny Things

Stop motion sometimes makes us do funny things, like put $25 worth of overly coloured hair gel down the drain, through a strainer, to strain out the clear plastic beads and fimo carrots.

Love also sometimes makes us do funny things, like asking at the drug store for some clear hair gel, and testing some different kinds out with the clerk to make sure they’re clear because they’re in coloured bottles.  Having to explain, vaguely and with embarrassment, that it’s for an “art project…”  Then presenting 3 bottles, or over 1 Litre of hair gel, at the cash counter and bringing it home for one’s sweetie.  (I’m glad I didn’t need 1L of KY jelly for this project, though he probably would have bought that, too…)

Sabela Cutting Cabbage: Lighting Breakdown

I’ve put together another little lighting tutorial — how ironic, since lighting is the one area I knew nothing about when I started this project.  However it seems to be going pretty well, helped swiftly along by the quality of the pre-established setups by a pro cinematographer — Marcus Elliott — and the things I’ve learned from him.

There are 8 lights on this scene, and 5 of them are either cheaply made or relatively cheap to buy.  So I thought a description of this particular setup might be helpful.

Sabela Cutting the Cabbage — Lighting Tutorial from Stephanie Dudley on Vimeo.

  1. Dedo w/ projection lens, angled from above, lighting the front of Sabela
  2. 150W Arri, also from above, shining directly down, from the side (highlighting Sabela’s left arm, and the rim of the cabbage)
  3. LED taped to a piece of white card, shining fill light to Sabela’s right side, and to light the copper pot (here is where I got the LEDs…  from a local dollhouse company.)
  4. LED light nested on the floor of the stage, shining up directly beside (and slightly behind) Sabela, providing a rim light on her left side, and a sparkle in her left eye
  5. LED light tucked behind counter, lighting the back wallpapered wall
  6. Home-made soft box lighting back countertop (for a how-to on making these, see this post)
  7. A second home-made soft box lighting the front countertop (which really only lights the face of the cabbage in this scene)
  8. A softbox built around a 150W Arri, lighting directly above the fridge in the BG.

A lot of these lights were “discovered” by moving the existing lights around a bit, turning them on and off (kind of like what I did with this video tutorial), nudging them left or right, and seeing what worked and what didn’t.  Same goes for camera… a little higher, a little lower, a little closer, further, until it’s just right.  Throughout the film, it has taken longer to set up each scene — camera, rigging, and lighting — than it has to shoot them.  This is the result of a personal philosophy… I feel like the beauty of a film is in the details, the things that contribute most dramatically to the overall mood of the piece… and for me, the animation itself is almost secondary.  Almost.  I certainly don’t sweat the animation as much as I do everything else.  In fact, I enjoy the animation process so much that the end result in this almost does not matter.  Almost.  (Perhaps what I’m saying here is sacrilege for many animators…)

I’ve been trying to arrange and organize the sound processes, recording, sound design, and mixing, many months down the road…  sound and lighting both add SO MUCH to a film’s atmosphere.  I’m very much looking forward to that stage, as well… sitting in a recording studio in Montreal, recording voice and music… I really can’t wait.

Anyway, about the lighting, I’m finding that it just needs to be meddled with until there is an “aha” moment.  Sometimes that can take a couple of days.  (This 10 second scene, for example, took 2 days to light and rig, one day to shoot.  Many of the scenes have taken much longer than this for setup…)

Introducing… Shelley’s Boiling Water!

A while back, I got a cute little package in the mail from Shelley — it was a little baggy of gel water, along with some tiny glass beads.  Well, I knew I’d get a chance to use this, because I needed to have a pot full of boiling water in the film… which gets turned into cabbage soup.

So, here it is — in two parts.  In part one, I’ve animated the puppet and cabbage leaves; then animated the boiling water as a separate pass.  (I can only handle one or two complicated things at a time when I’m animating, and it seemed like it would be easier to stabilize the pot and comp in the water in post…)

Sabela Cuts Cabbage Leaves from Stephanie Dudley on Vimeo.

I ended up cutting the leaves before shooting, with the intention to clean up the seams in post.  I used blue fun-tak to stick the leaves to this wire as they fell into the pot.  The wire was pretty difficult to control — it may have been too long — but it ended up looking OK.  The gel was really easy to animate — I just poked at it randomly, and moved the beads around with each frame.  I didn’t even need to tint it further than it was already — the greenish hue turned out to be a nice contrast to the coppery pot.  I used only the larger beads, which were about 2mm in diameter, set on top of the gel, as the water is slightly out of focus, so the glints of light seemed to work best as “bubbles” with those.

I’m in the process of putting together a little lighting tutorial on this scene, as I’m rather pleased with how the lighting turned out.  So there’s more to come on this…

Thanks for the water sampler kit, Shelley!  It worked great!